跟着官网学RabbitMQ-发布与订阅
课程地址:https://www.rabbitmq.com/tutorials/tutorial-three-java
在父项目 rabbitmq-foundation-project 中创建一个 module rabbitmq-work-queues-project,因为之前已经在父级 maven 中添加了 RabbitMQ 相关的坐标了子项目中就不用添加了
直接上代码,这次我们需要一个 Producer 和两个 Consumer(其实代码一样为了起两个 Consumer 服务省事)
Producer.java
package com.runbrick;

import com.rabbitmq.client.BuiltinExchangeType;
import com.rabbitmq.client.Channel;
import com.rabbitmq.client.Connection;
import com.rabbitmq.client.ConnectionFactory;

import java.io.IOException;
import java.nio.charset.StandardCharsets;
import java.util.concurrent.TimeoutException;

public class Producer extends BaseConfig {

    private final static String EXCHANGE_NAME = "publish-subscribe-log";


    public static void main(String[] args) {

        ConnectionFactory factory = getConnectionFactory();

        try (Connection connection = factory.newConnection(); Channel channel = connection.createChannel()) {
            channel.exchangeDeclare(EXCHANGE_NAME, BuiltinExchangeType.FANOUT);
            String message = "Hello World!";
            channel.basicPublish(EXCHANGE_NAME, "", null, message.getBytes(StandardCharsets.UTF_8));
            System.out.println(" [x] Sent '" + message + "'");
        } catch (IOException | TimeoutException e) {
            throw new RuntimeException(e);
        } catch (Exception e) {
            e.printStackTrace();
        }
    }
}
Consumer.java
package com.runbrick;

import com.rabbitmq.client.BuiltinExchangeType;
import com.rabbitmq.client.Channel;
import com.rabbitmq.client.Connection;
import com.rabbitmq.client.ConnectionFactory;

import java.io.IOException;
import java.nio.charset.StandardCharsets;
import java.util.concurrent.TimeoutException;

public class Consumer extends BaseConfig {
    private final static String EXCHANGE_NAME = "publish-subscribe-log";

    public static void main(String[] args) throws IOException, TimeoutException {
        ConnectionFactory factory = getConnectionFactory();
        Connection connection = factory.newConnection();
        Channel channel = connection.createChannel();


        channel.exchangeDeclare(EXCHANGE_NAME, BuiltinExchangeType.FANOUT);
        String QUEUE_NAME = channel.queueDeclare().getQueue();
        channel.queueBind(QUEUE_NAME, EXCHANGE_NAME, "");
        channel.basicConsume(QUEUE_NAME, true, (consumerTag, delivery) -> {
            String message = new String(delivery.getBody(), StandardCharsets.UTF_8);
            System.out.println(" [x] Received '" + message + "'");
        }, consumerTag -> {});
    }
}
Consumer2.java
package com.runbrick;

import com.rabbitmq.client.BuiltinExchangeType;
import com.rabbitmq.client.Channel;
import com.rabbitmq.client.Connection;
import com.rabbitmq.client.ConnectionFactory;

import java.io.IOException;
import java.nio.charset.StandardCharsets;
import java.util.concurrent.TimeoutException;

public class Consumer2 extends BaseConfig {
    private final static String EXCHANGE_NAME = "publish-subscribe-log";

    public static void main(String[] args) throws IOException, TimeoutException {
        ConnectionFactory factory = getConnectionFactory();
        Connection connection = factory.newConnection();
        Channel channel = connection.createChannel();


        channel.exchangeDeclare(EXCHANGE_NAME, BuiltinExchangeType.FANOUT);
        String QUEUE_NAME = channel.queueDeclare().getQueue();
        channel.queueBind(QUEUE_NAME, EXCHANGE_NAME, "");
        channel.basicConsume(QUEUE_NAME, true, (consumerTag, delivery) -> {
            String message = new String(delivery.getBody(), StandardCharsets.UTF_8);
            System.out.println(" [x] Received '" + message + "'");
        }, consumerTag -> {});
    }
}
可以看到这次的代码都没有基础配置因为我将它提取出来了,这样就能省一点事情。
package com.runbrick;

import com.rabbitmq.client.Channel;
import com.rabbitmq.client.ConnectionFactory;
import com.rabbitmq.client.DeliverCallback;

import java.nio.charset.StandardCharsets;

public class BaseConfig {

    public static ConnectionFactory getConnectionFactory() {
        ConnectionFactory factory = new ConnectionFactory();
        factory.setHost("localhost");
        factory.setPort(45672);
        factory.setUsername("user");
        factory.setPassword("123qwe");
        factory.setVirtualHost("test01");
        return factory;
    }
}
总体来说和 HelloWorld 差不多。这里不一样的点就是没有对应的 QUEUE_NAME 而是使用了EXCHANGE_NAME在消费者通过channel.queueDeclare().getQueue() + EXCHANGE_NAME 来实现
接受消息。前面说了 生产者是将消息发送到交换机(Exchange) 。如果在不配 exchange 参数的时候消息去到了 默认交换机(Default Exchange)。 所以这样生产者不用去关心我到底要发给谁了,我只要发出去就好了。消费者需要用的时候去收听这个消息就好了。这样就实现了一个简单的发布、订阅模式。这一组代码里面最重要的是下面这句话
channel.exchangeDeclare(EXCHANGE_NAME, BuiltinExchangeType.FANOUT);有几处不一样的点
- 使用 channel.exchangeDeclare 替代了 channel.queueDeclare
- 没有固定的
QUEUE_NAME而是使用了channel.queueDeclare().getQueue()生成 - BuiltinExchangeType.FANOUT 是个枚举,rabbitmq client 自带的 你可以写字符串
"fanout" - 消费者使用 channel.queueBind 将生成的 Queue 绑定到了 Exchange 上,而不是使用 channel.queueDeclare
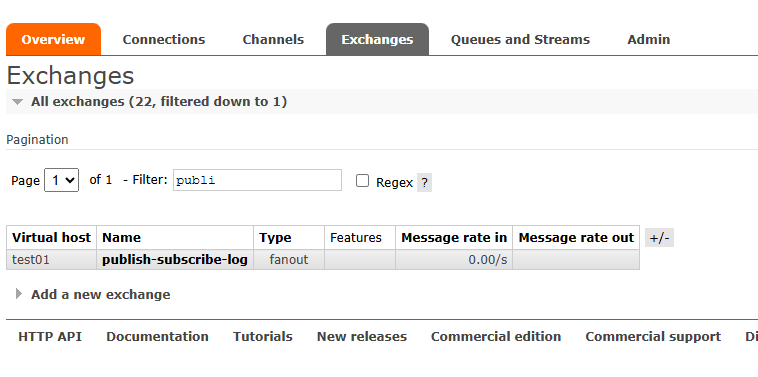
前面说了 生产者是将消息发送到交换机(Exchange), 这个就是使用的这个逻辑 。可以看到在运行 Producer.java 的 main 方法的时候看到 RabbitMQ Management 中会有一个我们定义好的 exchange 。

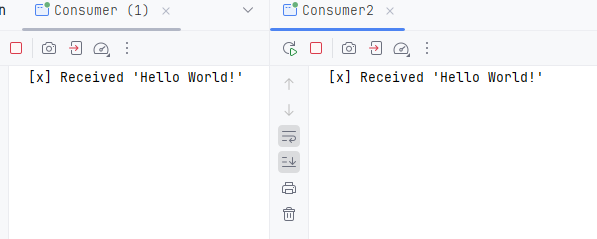
我们再启动 Consumer 和 Consumer2 的 main 方法后看到了 queue 里面有两个乱码的。这就是通过 channel.queueDeclare().getQueue() 获得的。这节课我们不需要指定queue,只需要绑定了交换机 Consumer 就能收到消息

按照这个顺序启动并不会收到刚才启动 Producer 的时候发送的消息。需要再次启动 Producer 才能收到消息。

在默认情况下,如果一条消息被发送到交换机(Exchange),但没有任何队列(Queue)通过绑定(Binding)与这个交换机建立关系,或者有绑定但消息的路由键(Routing Key)无法匹配任何绑定规则,那么这条消息将会被 RabbitMQ 直接丢弃,就像它从未存在过一样。