安装 cuda

  • 查看 nvidia 最高支持多少版本的 cuda
nvidia-smi.exe

+-----------------------------------------------------------------------------------------+
| NVIDIA-SMI 560.94                 Driver Version: 560.94         CUDA Version: 12.6     |
|-----------------------------------------+------------------------+----------------------+
| GPU  Name                  Driver-Model | Bus-Id          Disp.A | Volatile Uncorr. ECC |
| Fan  Temp   Perf          Pwr:Usage/Cap |           Memory-Usage | GPU-Util  Compute M. |
|                                         |                        |               MIG M. |
|=========================================+========================+======================|
|   0  NVIDIA GeForce RTX 4060 Ti   WDDM  |   00000000:01:00.0  On |                  N/A |
| 30%   30C    P8              4W /  160W |     654MiB /   8188MiB |      2%      Default |
|                                         |                        |                  N/A |
+-----------------------------------------+------------------------+----------------------+

安装 Miniconda

这样随便一个 cmd 都能执行 conda 命令了

创建并使用 conda 环境

// 创建
conda create --name openmmlab python=3.9 -y
// 使用
conda activate openmmlab


// 退出
conda deactivate 
// 删除 
conda remove --name your_env_name --all

安装 pytorch

根据安装的 cuda 版本、系统环境、语言环境在 https://pytorch.org/get-started/locally/ 选择最佳的安装版本。我的是 cuda 12.6 、Window11、conda所以使用下面的命令

// Latest PyTorch requires Python 3.9 or later. 最新版PyTorch需要Python 3.9或更高版本。

pip3 install torch torchvision torchaudio --index-url https://download.pytorch.org/whl/cu126

MMDetection 开始

  • 使用 openmim 来管理 MMEngine 和 MMCV。
pip install -U openmim
mim install mmengine
// 这里我自己加上了 <=2.1.0 不然官网项目起不来
mim install "mmcv>=2.0.0, <=2.1.0"
  • 下载 github 上的项目
git clone https://github.com/open-mmlab/mmdetection.git

cd mmdetection

pip install -v -e .
  • 下载配置文件和模型权重文件。
mim download mmdet --config rtmdet_tiny_8xb32-300e_coco --dest .
  • 测试项目
python demo/image_demo.py demo/demo.jpg rtmdet_tiny_8xb32-300e_coco.py --weights rtmdet_tiny_8xb32-300e_coco_20220902_112414-78e30dcc.pth [--device cpu]

报错

  • PyTorch 2.6,weights\_only\=True
        (1) In PyTorch 2.6, we changed the default value of the `weights_only` argument in `torch.load` from `False` to `True`. Re-running `torch.load` with `weights_only` set to `False` will likely succeed, but it can result in arbitrary code execution. Do it only if you got the file from a trusted source.
        (2) Alternatively, to load with `weights_only=True` please check the recommended steps in the following error message.

修改 C:\ProgramData\miniconda3\envs\openmmlab\lib\site-packages\mmengine\runner\checkpoint.py 中的

checkpoint = torch.load(filename, map_location=map_location)

checkpoint = torch.load(filename, map_location=map_location, weights_only=False)

摄像头识别

  • 下载 faster_rcnn_r50_fpn_1x_coco_20200130-047c8118.pth
http://download.openmmlab.com/mmdetection/v2.0/faster_rcnn/faster_rcnn_r50_fpn_1x_coco/faster_rcnn_r50_fpn_1x_coco_20200130-047c8118.pth
  • 识别
python demo/webcam_demo.py configs/faster_rcnn/faster-rcnn_r50_fpn_1x_coco.py checkpoints/faster_rcnn_r50_fpn_1x_coco_20200130-047c8118.pth
安装 cuda

  • 查看 nvidia 最高支持多少版本的 cuda
nvidia-smi.exe

+-----------------------------------------------------------------------------------------+
| NVIDIA-SMI 560.94                 Driver Version: 560.94         CUDA Version: 12.6     |
|-----------------------------------------+------------------------+----------------------+
| GPU  Name                  Driver-Model | Bus-Id          Disp.A | Volatile Uncorr. ECC |
| Fan  Temp   Perf          Pwr:Usage/Cap |           Memory-Usage | GPU-Util  Compute M. |
|                                         |                        |               MIG M. |
|=========================================+========================+======================|
|   0  NVIDIA GeForce RTX 4060 Ti   WDDM  |   00000000:01:00.0  On |                  N/A |
| 30%   30C    P8              4W /  160W |     654MiB /   8188MiB |      2%      Default |
|                                         |                        |                  N/A |
+-----------------------------------------+------------------------+----------------------+

安装 Miniconda

这样随便一个 cmd 都能执行 conda 命令了

创建并使用 conda 环境

// 创建
conda create --name paddleocr python=3.9 -y
// 使用
conda activate paddleocr 


// 退出
conda deactivate 
// 删除 
conda remove --name paddleocr --all

环境准备

  • 需要确认 python 的版本是否满足要求,使用以下命令确认是 3.9/3.10/3.11/3.12/3.13

    python --version
  • 需要确认 pip 的版本是否满足要求,要求 pip 版本为 20.2.2 或更高版本

    python -m pip --version
  • 需要确认 Python 和 pip 是 64bit,并且处理器架构是 x86\_64(或称作 x64、Intel 64、AMD64)架构。下面的第一行输出的是"64bit",第二行输出的是"x86\_64"、"x64"或"AMD64"即可:

    python -c "import platform;print(platform.architecture()[0]);print(platform.machine())"
  • Windows 暂不支持 NCCL,分布式等相关功能
  • 默认提供的安装包需要计算机支持 MKL, Intel 芯片都支持 MKL

根据版本进行安装

我刚才安装的是 12.6 所以我要下载的也是 12.6,这是我在我的项目里面使用了 conda activate paddleocr 进入了环境之后才执行的

 python -m pip install paddlepaddle-gpu==3.1.0 -i https://www.paddlepaddle.org.cn/packages/stable/cu126/

安装 paddleocr

 pip install paddleocr

测试一下

paddleocr ocr -i https://paddle-model-ecology.bj.bcebos.com/paddlex/imgs/demo_image/general_ocr_002.png --use_doc_orientation_classify False --use_doc_unwarping False --use_textline_orientation False

结果:

{'res': {'input_path': 'C:/Users/Administrator/.paddlex/predict_input/general_ocr_002.png', 'page_index': None, 'model_settings': {'use_doc_preprocessor': True, 'use_textline_orientation': False}, 'doc_preprocessor_res': {'input_path': None, 'page_index': None, 'model_settings': {'use_doc_orientation_classify': False, 'use_doc_unwarping': False}, 'angle': -1}, 'dt_polys': array([[[152,  22],
        ...,
        [153,  77]],

       ...,

       [[ 99, 455],
        ...,
        [ 99, 480]]], dtype=int16), 'text_det_params': {'limit_side_len': 64, 'limit_type': 'min', 'thresh': 0.3, 'max_side_limit': 4000, 'box_thresh': 0.6, 'unclip_ratio': 1.5}, 'text_type': 'general', 'textline_orientation_angles': array([-1, ..., -1]), 'text_rec_score_thresh': 0.0, 'rec_texts': ['登机牌', 'BOARDING', 'PASS', '日期DATE', '舱位', 'CLASS', '序号', 'SERIALNO.', '座位号', 'SEAT NO.', '航班FLIGHT', 'MU 2379 03DEC', 'W', '035', '始发地', 'FROM', '登机口', 'GATE', '登机时间', 'BDT', '目的地TO', '福州', 'TAIYUAN', 'G11', 'FUZHOU', '身份识别IDNO.', '姓名NAME', 'ZHANGQIWEI', '票号TKTNO.', '张祺伟', '票价FARE', 'ETKT7813699238489/1', '登机口于起飞前1O分钟关闭GATESCLOSE1OMINUTESBEFORE DEPARTURETIME'], 'rec_scores': array([0.9971087 , ..., 0.97327828]), 'rec_polys': array([[[152,  22],
        ...,
        [153,  77]],

       ...,

       [[ 99, 455],
        ...,
        [ 99, 480]]], dtype=int16), 'rec_boxes': array([[152, ...,  77],
       ...,
       [ 99, ..., 480]], dtype=int16)}}

@Service 源码

@Target({ElementType.TYPE})
@Retention(RetentionPolicy.RUNTIME)
@Documented
@Component // 看这里
public @interface Service {
    // ... 
}

@Controller 源码

@Target({ElementType.TYPE})
@Retention(RetentionPolicy.RUNTIME)
@Documented
@Component // 看这里
public @interface Controller {
     // ...
}

@Repository 源码

@Target({ElementType.TYPE})
@Retention(RetentionPolicy.RUNTIME)
@Documented // 看这里
@Component
public @interface Repository {
    // ...
}

@Service、 @Controller、@Repository元注解 都应用了 @Component ,这就能看出来从核心功能上讲,@Service、 @Controller、@Repository@Component 做的事情几乎完全一样:都是将一个类标识为 Spring Bean,交由 Spring 容器进行管理。但它们在语义和应用分层上有明确的区别。

  • Web 层 ( @Controller ) : 接收 HTTP 请求,调用服务层。
  • 服务层 ( @Service ) : 处理核心业务逻辑。
  • 持久层 ( @Repository ) : 与数据库进行交互。
  • @Component 是 Spring 框架中最基础、最通用的构造型注解。它的作用就是告诉 Spring:“请扫描这个类,为它创建一个实例(Bean),并放到 IoC 容器里管理起来。

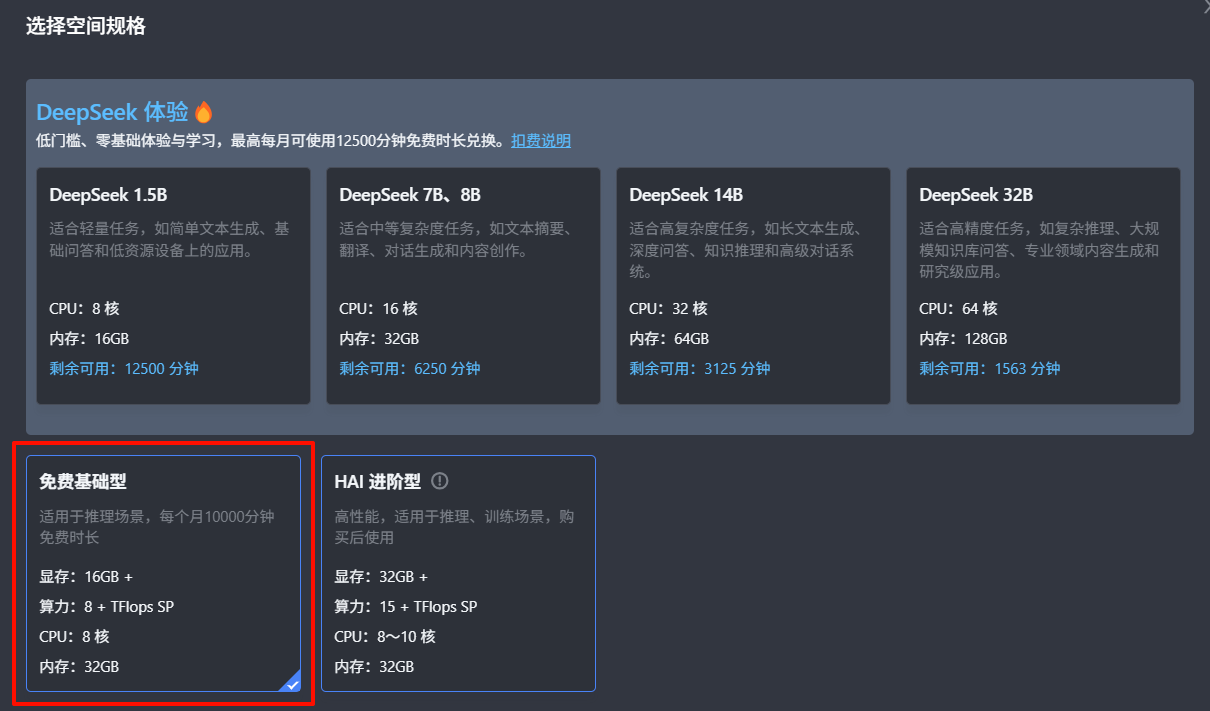
我使用的是腾讯的 Cloud Studio 作为开发环境。创建的免费基础型
2025-07-05T07:47:51.png

  1. 创建 venv 环境。

    python -m venv myenv
  2. 激活环境,这个 Cloud Studio 是 Ubuntu 的系统所以需要使用 source 激活

    source myenv/bin/activate
    
    # 退出虚拟环境 (等你不使用的时候再说)
    deactivate
  3. 安装 whisper 环境的前置依赖

    • 安装 ffmpeg

      sudo apt update && sudo apt install ffmpeg
    • 安装 python 相关的前置依赖

      pip install setuptools-rust tiktoken
  4. 安装 whisper

    pip install -U openai-whisper